The ability to measure accurately and precisely is important for a number of aspects of scale modeling because, to one degree or another, modelers are usually attempting to reproduce a miniature representation of an actual subject. This means that you must be able to accurately scale down prototype measurements and then precisely transfer them to a model. Even if you are working from a kit, you may find yourself measuring the kit parts and comparing them with known dimensions so that you can verify their scale and accuracy. When dimensions or accurate drawings are not available, it may be necessary to derive measurements from photographs. In addition to measuring distances, modelers also frequently need to use squares and protractors to measure angles. So whether it be planning or construction, the ability to measure accurately is essential.
The most basic of measuring tools are rulers. Measurements taken with rulers should be considered approximate and their accuracy is quite subject to the skill and interpretation of the operator. Errors in measurements taken with rulers arise because of the line thickness of the increments on the ruler and the distance of those increments from the surface of the object that is being measured. The most “precise” rulers have beveled edges with thinly engraved increments. Because rulers lack precision, it’s usually a good idea to limit their use to full size or large measurements where their error will be of minimum effect. For example: While using a ruler it is easily possible to generate an error of .025”. Now if this sort of error occurs in measuring up a 1/12th scale automobile, then the resulting error will be ± .3 scale inches. However, if you’re measuring up a 1/700 scale battleship, then that same error will result in an error of ± 17.5 scale inches. Rulers are generally most useful in drawing, laying out gross dimensions, or measuring objects that can be placed in direct contact with the ruler’s edge.
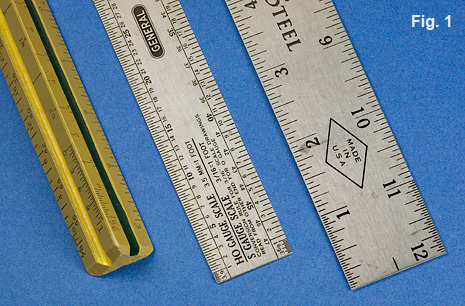
Rulers are available in a variety of scales. Fig 1. A typical ruler will be laid out in basic inches or centimeters with various divisions in between. Rulers can also be found in some of the more popular modeling scales such a 1/48 or HO. Rulers used by draftsmen are available in a number of different scales expressed as fractions of an inch and frequently found in the form of a three-sided ruler featuring scales from 1/8”=1’ to 3”=1’.
The first rule of rulers is “don’t measure from the end.” Rulers are designed to measure from one mark to the next, not from the end to a mark. The end could be damaged or shortened and measurements would be even less accurate. Most good rulers begin their scales a small distance from the edge and many even have a special set of graduations leading up to the zero point. If you’re using a ruler with the edge being zero, measure from the 1” mark and then subtract one inch from the measurement. When using a ruler with a graduated scale to the left of the zero, align the right hand increment first so that what you are measuring extends to the left of the zero but stays within the graduated scale, Fig. 2. For the final measurement, add the values of both scales together. While I seldom measure a model with a ruler, I would never be without several good metal rules of different sizes simply for quickly checking drawings and because they make excellent straight edges to scribe and cut against.

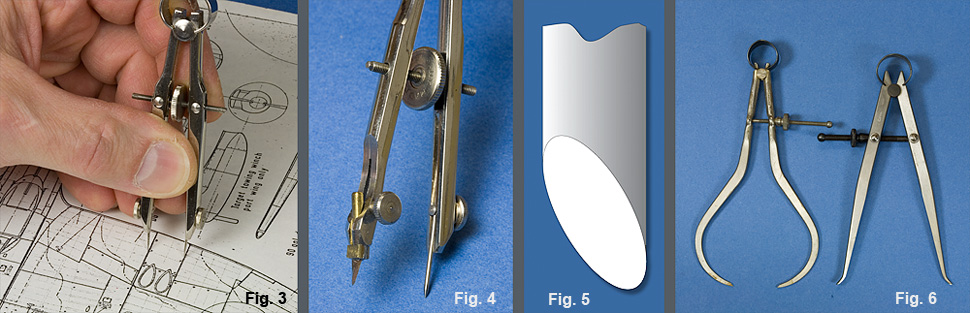
The purpose of a spring caliper or divider is to transfer or compare dimensions. This is done most frequently when working with drawings so that distances can be compared to a scale published along with the drawing or transferred directly to the model, Fig. 3. Dividers can also be used to mark off regular increments or scribe circles. They are available in styles used by machinists or types with replaceable nibs that are used by draftsmen, Fig. 4. A simple cutting blade can easily be made by sharpening a piece of steel wire into the shape shown in figure 5. Spring calipers are also available as “inside” and “outside” types, Fig. 6. Inside calipers measure between opposing surfaces or inside of things and outside calipers measure outer surfaces of objects.
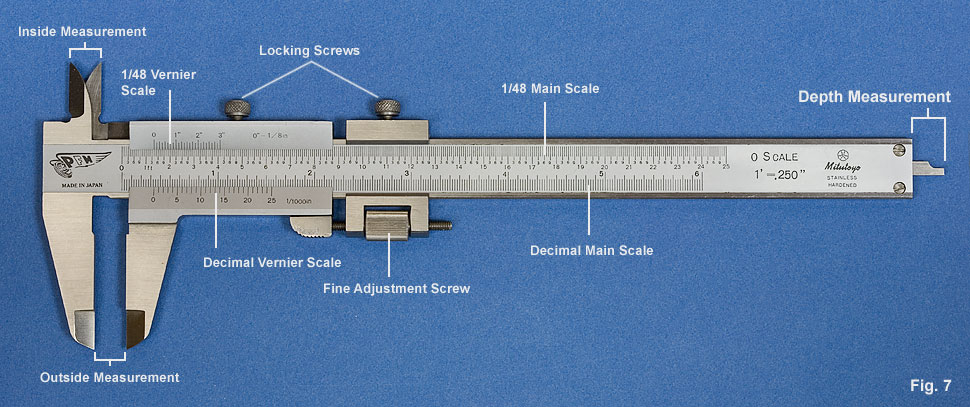
Without a doubt, the most useful measuring tool for modeling is a precision measuring caliper, Fig. 7. A single caliper can allow you to measure outside, inside, and depth dimensions. Precision calipers are manufactured in a variety of sizes and styles as well as units of measurement. Chose a caliper that feels comfortable and operates smoothly. Keep in mind that a 6” scale is more than adequate for most modeling chores.
One variation among calipers is how the jaw moves and locks. Some have a spring-loaded release that, when depressed, unlocks the slide. Most simply move freely unless a locking screw is tightened. Some calipers are constructed with a two piece slide that provides for additional precision in movement, Fig. 7.
Typical units of measurement for calipers are fractional and decimal inches along with metric. Some calipers have also been manufactured in specialized scales such as “O” scale (1/48 scale), Fig. 7. In the US, the most common scale is decimal inches..
Today, because of their ease in use, the digital and dial calipers have pretty much replaced the vernier type caliper. However, the vernier scale is used on both calipers and micrometers and I much prefer the handling of vernier micrometer over a bulky digital version. For this reason, along with the fact that verniers never need batteries, I think it is good form that a craftsmen should be able to read a vernier. Otherwise it’s like being the youngster who can only read a digital watch or someone who can’t drive a manual shift car.
The vernier is a set of marks on the movable slide. It’s that “funny” scale that never seems to line up with anything. In fact, the marks on the vernier do line up with something and their function is to accurately indicate the “in-between” distance when the zero reference mark (the first mark) on the slide does not fall exactly opposite a mark on the main scale. To read a vernier scale, the first step is to look at the zero mark of the vernier scale. Does it fall exactly opposite a mark on the main scale? If it does then you need go no further. Just read the measurement directly off the main scale. You can verify that the mark is perfectly lined up because none of the other marks (except the last mark) on the vernier line up better with a mark on the main scale.
If the zero mark on the vernier falls between marks on the main scale, make a note of the value on the main scale that falls immediately to the left of it. This is your “base” value, to which you must add the “in-between” value. To determine the additional value, scan the vernier scale until you find a mark that lines up perfectly with a mark on the main scale. Then read the value off the vernier scale and add it to the base value.

On a typical decimal inch scale, the graduations on the main scale will give values to the nearest .025” (twenty-five thousandths of an inch). For example, Fig. 8., the zero mark on the vernier scale falls just to the right of the 1” mark, the 0.1” mark and the 0.075” mark on the main scale ... but not quite to the 2” mark. So the base value is 1.175”. But exactly how close is it to the 2” mark? To find that value, look along the vernier scale and locate the mark that is exactly in line with any mark along the main scale. In this case it is the .018 mark. So you simply add .018” to 1.175” for a value of 1.193”. While it seems to be a lengthy process, after you have done it for awhile, it will become second nature.
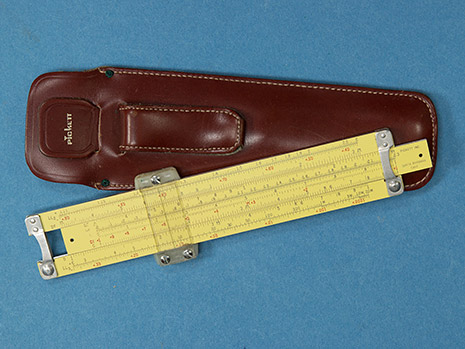
Vernier scales are the basis of calulation with a slide rule. When I was in high school and university, there was no such thing as a personal computer, let alone a hand held calculator. All our calculations were done on a slide rule. Neil Armstrong took this same 6” pocket slide rule with him to the moon.
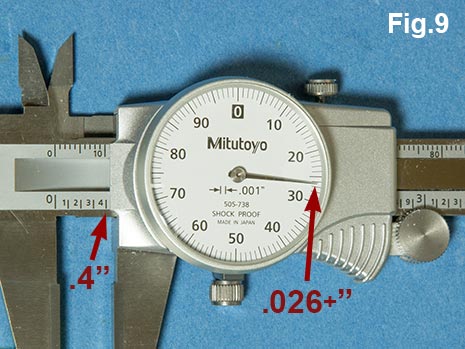
Calipers with a dial indicator, Fig. 9. work much the same way as a vernier in that you add the number indicated on the dial to the number on the main scale or you can count the revolutions of the indicator. The advantage is that you don’t have to make the calculation. The downside is that they are the most delicate of the different caliper types.

The latest and greatest type of caliper is the digital caliper, Fig. 10. It is the type that I reach for the most. The digital display reads the entire measurement so it is extremely fast to read. You also have the advantage that you can quickly switch between inches and metric. A digital caliper can be zeroed at any point
This feature can either prove to be a convenience or a problem. In normal use, close the jaws and zero the caliper. Open and close the jaws and check that the value does indeed go back to zero, if it doesn’t, make sure there isn’t debris between the jaws and zero it again. You should be able to open and close the calipers and have it reliably return to zero. Now you can make your measurement.
A digital caliper can really save you time when comparing the size of two objects. Simply place the caliper on the first object and press the zero button. Now transfer the caliper to the second object and the caliper will read the difference. The caliper will register negative or positive values so it isn’t important whether you measure the larger or smaller object first. This saves a lot of time in subtraction.
Because they are so easy to use, I would recommend this type over the others. However, when selecting a digital caliper or micrometer, one consideration is battery life. The worst scenario is that you reach for your caliper and the battery is dead, you have no spare and the stores are closed. My favorite caliper has an on/off switch and the battery lasts for years. Most digital calipers and micrometers now have auto on/off switches and I find that the ones that I have with auto on/off just eat batteries.
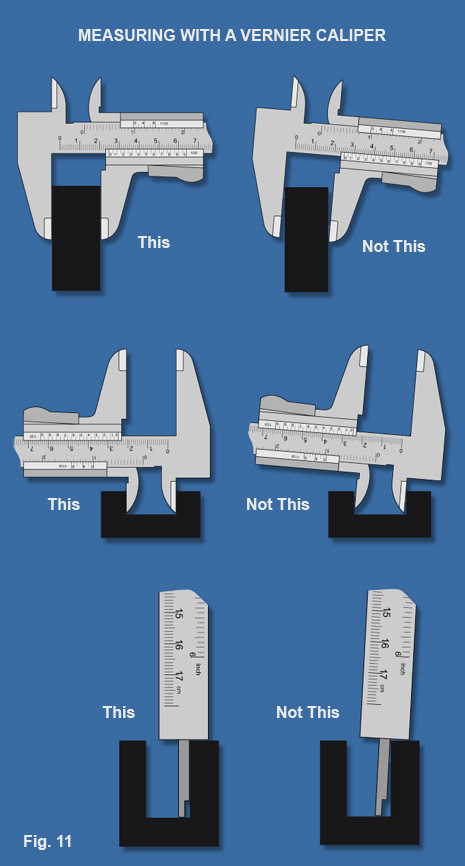
No matter which type of caliper that you choose, there are some common basic techniques of how to use them successfully. Fig. 11, shows how to make different types of measurements. While this figure stresses the need for proper positioning of the calipers, another important factor is the pressure applied to the jaws. You want to be careful so that you don’t distort or compress what you are attempting to measure. A good habit to get into is measuring everything at least twice.
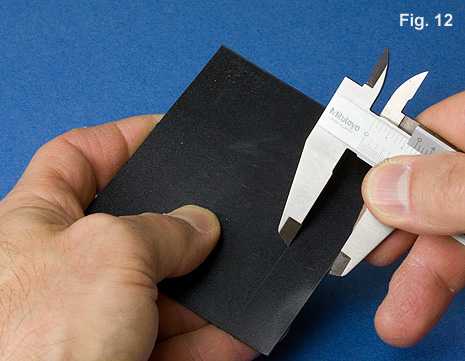
Fig. 12 shows a useful modification to a vernier caliper. The tips of the jaws have been sharpened. This helps in two ways. First, this allows the caliper to fit into tighter spaces and second it is sharp so you can easily scribe precise lines. Some calipers are manufactured this way and don’t need to be modified. One word of caution: If you perform this modification on a grinder, be careful to remove material only from the outside portions of the jaws and work slowly so you don’t overheat the tips. Take extra care to prevent abrasives from being incorporated between the slide and the rule.